Imagine retreating to your abode, seeking a silent oasis in an increasingly noisy world. Soundproofing, once the forte of recording studios and private theaters, is now essential in many homes. Sound mats, pivotal in this quest for quiet, have grown in appeal. Delve into this comprehensive guide and discover how to transform your space into a haven of tranquility.
Choosing the Right Sound Mat
To truly combat noise, one must understand its nature. There are two primary culprits: airborne disturbances like conversation or music and impact noises such as footsteps. Sound mats, with their diverse range, target these nuisances differently. Your choice should, therefore, reflect your primary concerns. Beyond the type of noise, the material’s quality should be paramount. Products vary, from foam to dense vinyl barriers. Often, the denser the material, the more effective the noise reduction. But how does one decipher this? Look for mats with high Sound Transmission Class (STC) ratings; they measure a partition’s ability to block airborne sound. Lastly, remember that size matters. While thicker mats might promise better soundproofing, they might also disrupt floor levels. It’s a balancing act between practicality and noise reduction efficiency.
Essential Tools and Materials
Embarking on this auditory adventure demands the right toolkit. At the base level, a utility knife, measuring tape, and marking instruments like chalk or pencil are indispensable. But the true hero in this story is often the adhesive. Specialized glues, aptly named acoustic sealants, act as barriers, ensuring no sound wave escapes through gaps. When scouting for these sealants, compatibility with your chosen mat is essential. Lastly, arm yourself with supplementary items such as soundproofing tape or rubber gloves. These can prove invaluable, especially when sealing seams or navigating through sticky situations. On the other hand, employing the help of a self leveling concrete contractor often proves as the best course of action.
Preparing Your Space
Begin with a blank canvas. The area awaiting the sound mat should be free of debris, dust, or any dampness, that could compromise the mat’s adherence. A solid foundation is crucial. Examine the subfloor, keeping an eye out for any imperfections like bumps or uneven patches. These could create gaps, diminishing your soundproofing efficiency. While you’re at it, attend to any squeaky floorboards or loose tiles. It’s not just about laying a mat; it’s about ensuring its optimal performance.
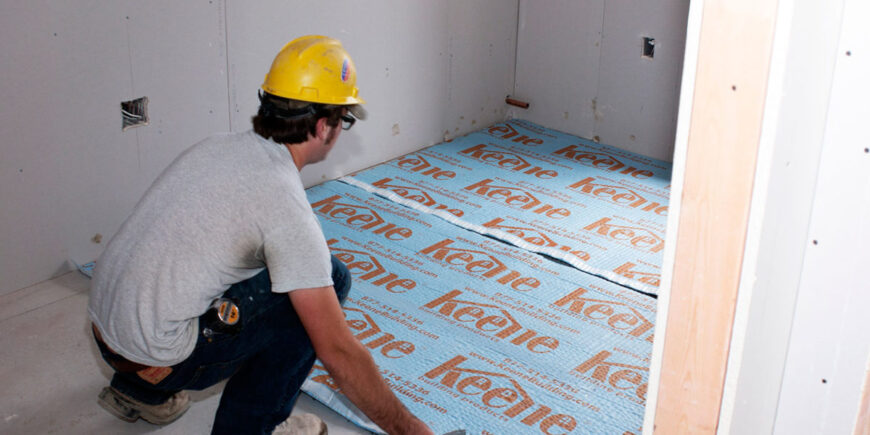
Sound Mat Installation Steps
Soundproofing success hinges on precision. Begin by measuring your space, then cut the sound mat, allowing for a slight margin. This buffer ensures comprehensive coverage. Once measurements are in hand, the actual application follows. Spread the acoustic sealant on the mat’s back, pressing it firmly onto the subfloor. Bubbles or gaps are your adversaries here; ensure there are none. Finish by trimming any excess material, providing a neat and efficient seal.
Seam and Edge Sealing Techniques
Where two mats meet, there lies a potential Achilles’ heel. Fortify this junction with soundproofing tape, ensuring sound doesn’t find a sneaky path. The perimeter, where mat edges kiss the walls, demands equal attention. Seal these boundaries with acoustic sealant or tape. If navigating corners or intersections, a neat trick is to carve a small V-shaped notch in the mat. This aids in achieving a snug fit, ensuring no compromise on soundproofing effectiveness.
Soundproofing Troubleshooting
On the off chance that whispers of noise still creep in, be a detective. Find the source, be it gaps beneath mats or weak points at seams. Address the found flaws directly. For bubbles or gaps, more adhesive might come to the rescue. Weak seams? More tape could be the antidote. It’s worth noting that soundproofing sometimes demands creativity. Adjustments or even doubling up on mats in tricky areas can spell the difference between quiet and cacophony.
Maintaining Your Soundproofing Solution

Once installed, your sound mat isn’t a ‘set and forget’ affair. Regular inspections, especially focusing on seams and edges, can preempt issues. For cleaning, gentleness is key. Steer clear of abrasive tools or harsh chemicals that might wear the material. If you spot damage or areas losing their effectiveness, consider patching rather than a full replacement. It prolongs your mat’s life and keeps soundproofing consistent.
Soundproofing Benefits and Considerations
Beyond the blissful silence, soundproofing offers a plethora of benefits. From deeper sleep to diminished stress, the advantages touch various facets of life. But remember, while it blocks outside noise, it also contains indoor sounds. For musicians or movie buffs, this is ideal. However, think about potential safety implications like muted fire alarms. On the bright side, soundproofing is not just about personal peace. In bustling urban environments, it can boost property value, making it an investment in serenity and financial returns.
Sound Mat Installation Dos and Don’ts
Invest in stellar materials; their quality directly ties to your soundproofing’s success. However, avoid hastiness during installation. Precision over speed ensures maximum efficiency. If ever in doubt, there’s no shame in seeking expert opinions. While many venture into soundproofing as a DIY project, consulting seasoned professionals can provide invaluable insights.
Cost-Efficient Soundproofing Tips
Crafting a silent sanctuary doesn’t necessarily mean emptying your pockets. Affordable solutions abound if you know where to look. Start with weatherstripping doors and windows. These gaps, though minor, can be significant conduits for noise. An inexpensive weatherstrip can seal these breaches effectively. Next, consider rugs and soft furnishings. They might seem rudimentary, but these can absorb sound remarkably well, especially in spaces with hard floors. Curtains too, especially thicker ones, can act as impromptu sound barriers. If investing in sound mats, shop around.
Professional Installation vs. DIY

Venturing into the realm of soundproofing, one often grapples with a critical decision: to call in the experts or take the DIY route. Each approach has its merits. Professional installation, while costlier, offers peace of mind. These experts bring experience, ensuring soundproofing is thorough and effective. They often possess advanced tools and techniques, ensuring seamless finishes and optimized performance. Moreover, professionals can assess your space, advising on the best solutions tailored to your needs. On the other hand, DIY is usually kinder on the wallet.
Final Words
The quest for silence in our modern world might seem daunting, but with the right tools and knowledge, tranquility is attainable. Sound mats, when chosen and installed meticulously, stand as guardians of peace. With this guide in hand, you are primed to transform your space, ensuring every corner resonates with the sweet symphony of silence.